Welcome


Welcome to The Gingerbread Bunny! I'm Sarah, a textile artist specialising in crochet and felt based in Wigan in the North-West of England.

On my blog, you can find my day-to-day craft adventures and tutorials.

You can find details of my work for sale and workshops on my website - www.thegingerbreadbunny.co.uk

Tuesday 30 August 2011

The end of summer!

Well, it is here, the end of the Summer holidays (not that we've seen much of the summer).  On Thursday I go back to school and have my pencil case and new school bits 'n' bobs ready to go and have planned lots of exciting lessons to teach my new class.  The start of the new school year is really my New Year, it's a new start, a new class and new lessons and it is quite exciting.  It does, however, mean that there will not be as much time for me to craft and, once again, I will have to squeeze it in during my dinner time and whilst catching up on my favourite TV programmes at night!

The start of the new school year is also a sign that autumn is on it's way and it is nearly time to get the wooly's out - cardigans, jumpers, hats, mittens and scraves!  Hooray!  It is heaven for knitters and crocheters as we can finally wear all the items we have been making during summer. 

I recently bought the Complete Guide to Knitting and Crochet by Nikki Trench after it was recommended to me by a friend.  It is a great book and has lots of information on the history of knitting and crochet, yarn, basic stitches and more complicated ones as well as a good number of modern patterns. 


I have already crocheted hats (one for me in Noro Silk Garden and one for a Christmas present) and am currently working on the Frill Shawl in a gorgeous teal King Cole Haze Glitter.  I have plans for other projects in the book to!  It is well worth getting and I bought my copy for £1.51 on Amazon and I have seen it in Asda and The Works to.  


I can't wait to wear my hat!
Blog Hopping
This coming weekend, 3rd September,  I am involved in something rather exciting in the blogging world - my first blog hop!  All I am going to tell you is that it is all linked to Art from the Heart's 10th Birthday celebrations and includes a bit of a competition.  Check my blog on the 3rd of September from 10am for more exctiting details.    

Sunday 21 August 2011

The dreaded 'C' word!

The dreaded 'C' word has been popping up on Twitter and Facebook this week!  As the summer holidays draw to a close (not that we have seen so much of the summer) some of my favourite crafty magazines have been asking their loyal readers what they want to see in their Christmas editions.

But it's only August!!! I hear you all cry at the computer. And I feel exactly the same.  I hate it when the supermarkets begin to stock their festive ranges in August and, on a recent trip to a local crafty/homeware/vistor attraction, was riled to see them announcing the arrival of a mystery man (the display consisted of a dressed up mannequin, wearing a red suit surrounded by wrapped up boxes and snow sporting a large cardboard box with a question mark on it!  Can you guess who it is?!) 

Now don't get me wrong, I am no grinch and I absolutley LOVE Christmas, but I like it to start in December and be 4 weeks of excited preparation.

However, when you have handmade goodies to make for gifts, you need a little bit more that 4 weeks to make it all.  And so this week I started to think about who I was, and wasn't, going to be handmaking gifts for this year and what I was going to be making.  I have narrowed down my decision making to three key questions to ask yourself when handmaking gifts for Christmas.


Box with Gift courtesy of Robo Android on Flickr

1)  Will the recipient appreciate it?
I am not going to spend my time knitting/crocheting/sewing for someone who doesn't really appreciate it.  Now this doesn't make them a bad person, it just means they don't get it!  For example Mr Bunny actually said to me yesterday 'I don't want any handmade stuff for Christmas!' He is very supportive of my crafting and can see that lots of people appreciate it but, he doesn't want.  So therefore, Mr Bunny and a few other people will be getting money for Christmas this year.


Clock courtesy of wiwin.wr on Flickr

2)  How much time have you got?
I am knitting one scarf for Christmas this year and I have already cast it on.  I know that it will probably take me until Christmas to complete it so I have started it now.  Most other people are going to be getting small, quick items probably knitted or crocheted.  Mitts and hats are great for this as they knit/crochet up quickly. 


Money courtesy of Community Friend on Flickr

3)  How much will it cost?
For me, this is an important factor.  I do not have, as Mr Bunny often reminds me, a £50 tree in the back yard (although I wish I did).  So I don't want my gifts to cost too much in money.  By making smaller items, such as mitts and hats, you can afford to invest in a nicer ball of yarn as you won't need as many!

I have indeed asked myself these three questions and have drawn up a list of recipients, gifts and in some cases yarn (a good excuse for a yarn destash!) that I will be using.  Some may say my list is a bit ambitious and I do have a backup plan if I run out of time (Gift vouchers are wonderful aren't they?!) but I am determined to get these made and the sooner so what am I still doing here?  I have Christmas presents to make!

Monday 15 August 2011

Keep calm and drink tea!

Photo courtesy of nicasaurusrex on Flickr
There is nothing better than a good cup of tea.  In fact, we Brits are well known for drinking copius amounts of the stuff.  The first thing we do when someone visits is to put the kettle on and 'brew up', making everyone a nice, refreshing cup of tea (and if you're lucky, there is often a scrummy biscuit to go with it!)  Even when faced with a crisis, there is always someone on hand to offer you a cup of tea because, quite frankly, a cup of tea solves everything!

As you are probably already aware, last week we witnessed some of the most appauling behaviour from a minority (and I emphasise that it was a minority) of citizens, as they rioted, looted and quite frankly made a right show of themselves, across the country.  In the face of adversity, there were, as only we could have in Britain, people on hand to offer our police officers a good cup of tea (all be it served on the back of a riot shield) to show their support for the very difficult job they had to do.


On Facebook, a group was started to encourage us all to calm down and drink a cup of tea. 

So, this brings me onto my crafting.  In the most recent issue of Inside Crochet there was a pattern for a magnificent tea cosy designed by the amazing Aoibhe Ni (I adore her patterns).  It was unusual, funky and quirky and so I knew I had to make it.  I raided my stash and found the perfect wool, as it needed to be one that would felt, and set about to make the tea cosy.  It had it's outing at the Stitch 'n' Bitch I hosted with my friends (my Mum, Jo and Jan) last Friday, and was admired by all. 


Inspired by making this tea cosy, I decided to have a go at desigining and making one of my own, and this is what I came up with;


It reminds me of a swimming cap from the Seventies!

Saturday 13 August 2011

How to crochet a Granny Square!


I love granny squares!  They are traditonally associated with the seventies when pretty much everything that was crocheted was a granny square.  This has led to the poor granny square being labeled as out of date and a bit naff.  However, granny squares can be so gorgeous and beautiful and make great blankets and bags whilst also being really easy and quick to make.

This tutorial has developed really for my friend, Jan, who at my recent Stitch 'n' Bitch asked me to teach her how to crochet a granny square.  So we sat down together and worked through one slowly and then she had a go on her own.  She took home my finished square to refer back to and I was going to email her the written pattern for a basic granny square but, sometimes things make much more sense when there are pretty pictures to show you what to do!

So, here it is.  My guide to crocheting a basic granny square.

How to Crochet a Granny Square

Chain 6


Join the chain with a slip stitch into the first stitch to make a ring


ROW 1

Chain 3 (This counts as the first treble stitch)


The next stitches are going to be worked into the ring not into the stitches.


We are going to start to make the square shape - 4 sides so 4 sets of stitches!
2 trebles, chain 1
3 trebles, chain 1
3 trebles, chain 1
3 trebles, chain 1


Join to the 3rd stitch of the chain 3.


So now you can see a square emerging. The 3 trebles make the sides of the square and the chain 1's make the corners of the square!

ROW 2

Slip stitch into the first chain 1 space


Chain 3 (This counts as the first treble)

Still working in the same chain 1 space;

2 trebles
Chain 2
3 trebles
Chain 1


Working in the next chain 1 space;

3 trebles
Chain 2
3 trebles
Chain 1

Repeat this set of stitches in the remaining 2 chain 1 spaces.

Join to the third stitch of the first chain 3 in this row with a slip stitch


ROW 3

So now it should be really easy to see the square shape and to spot the corner chain 2 spaces and the side chain 1 spaces. 

Slip stitch into the first corner chain 2  space.
Chain 3 (The first treble in this corner)

Working in the same chain 2 space;
2 trebles
Chain 2
3 trebles
Chain 1

SIDES
Working in the next chain 1 side space;
3 trebles
Chain 1

CORNERS
Working in the next chain 2 cornber space;
3 trebles
Chain 2
3 trebles
Chain 1

Repeat the sides and corners instructions above in the remaining spaces.
Join to the third stitch of the first chain 3 in this row to join.


And there it is, your granny square!  Now this is a really basic granny square but is so beautiful. 

To change the size of your square, just change the size of your hook or the thickness of your yarn.

For a multi-coloured square, fasten the yarn off at the end of the row and change your yarn colour at the start of the next row (slip stitch the new yarn into the corner space before chaining 3 stitches)

There are lots of different styles of granny squares out there.  Crochet Me has a great free downloadable book of patterns using granny squares, all you need to do is sign up for their free email newsletters to get your hands on the booklet.

I hope you have enjoyed this tutorial and found it useful.  I would really appreciate any constructive feedback on how I could improve the tutorial or what you liked about it so my next ones can be even better. 

Keep tuned for a tutorial on different ways to join your squares together.

Wednesday 10 August 2011

All buttoned up!

I hope everyone is well and that you have all been getting up to lots of crafting!  I am writing this whilst eating some scrumptious homemade shortbread (The recipe is Lorraine Pascale's Dreamlike Shortbread from the Baking Made Easy programme and it is scrumptious!)

Recently, I read a great post by Martine of iMake all about buttons. She had been making buttons with shrink plastic and Fimo (oven bake clay) and if you are interested in buttons then check out her posts Button Love, First Attempt at Fimo Buttons, Making Buttons and The Gift of Buttons

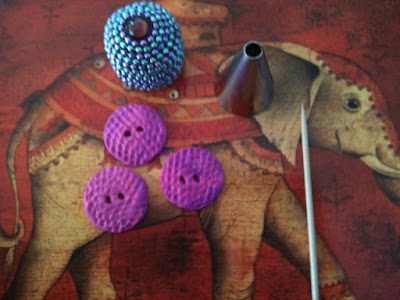
I loved the idea of making my own buttons and managed to get some Sculpey (another make of oven bake clay) from a local craft store and so set about to make some buttons and some beads.  Here is how I did it!

I began by rolling out the clay using a typical kitchen rolling pin.  I discovered that it is important not to roll it to thinly as it becomes bendy when baked.  Thicker is better!

Don't roll it too thin!

I didn't have any special clay cutters and raided the kitchen drawers for suitable shaped and sized implements for cutting out my buttons.  I used a icing pipe to make circular buttons, the top off a cocktail stick box to make my square buttons and cookie cutters I had in to cut out star and bunny shapes!  I made the beads by rolling into shape and then sticking a cocktail stick through the middle for the whole.  I had lots of fun experimenting with my implements to create texture on the buttons to.


I also experimented with mixing the 2 colours together.  You can get some great swirly effects.


I then baked the buttons and beads in the oven for around 30 minutes.  I used a baking tray covered with baking paper as I was worried they may stick, although now I'm pretty sure they wouldn't have done.  Once they where firm I left them to cool and there you have it!  Gorgeous buttons and beads to adorn my future makes.


If you fancy having a go at making your own buttons and beads, oven bake clay is a really easy and cheap way to do it and lots of fun!


Wednesday 3 August 2011

Frog it!

Rip it, Rip it, Rip it!  That is the sound my crochet makes as I frog back, or rip out, all the lovely work done on my Esmee Cardigan!  In fact, the phrase 'frog it', as used extensivley by knitters and crocheters, has come from rip it sounding so much like ribbit, the noise associated with those lovely green amphibians, frogs!

I have decided to stretch my crocheting skills to the next level and make a full blown cardigan.  I have been admiring this paticular one, Esmee by Sarah Francis, in the issue 13 of Inside Crochet magazine for some time.  What has been putting me off was the ADVANCED difficulty rating: EEEEK!  Am I ready for an advanced difficulty rated pattern?  Can I do it after only 6 months on the hook?  I am never one to turn down a challenge and, after coming across some gorgeous teal King Cole yarn with a pretty sparkly thread running through it in a craft store, I knew that it had to be done.


See how pretty it is?  I just couldn't resist!

Now then, was it not enough for me to be attempting an advanced diffculty pattern?  Did I not feel that this was challenge enough?  Of course not!  I had to choose a yarn that is considerably thicker than the one used in the pattern.  Now then, some people would do a guage swatch.  Ha!  Not me, of course I do not need to waste my time on something so silly as a guage swatch - how silly I was! 

So far I have started and frogged the cardigan 4 times!  Given that it is a foundation chain of 233 stitches that is an awful lot of crochet to frog.  I am now beginning to understand the need for a guage swatch, if not to get my crochet right first time, but to preserve my own (and my husbands) sanity.

There is a happy ending to this story though!  I have learnt 3 things from my frogging experiences:

1.   After all of the attempts, the pattern is pretty much ingrained in my brain and could probably be completed from memory.
2.  I have learnt that guage swatching is not a waste of time and is suggested for a reason. 
3.  When substituting yarns, pick one the same weight.

I will not, however, be defeated by this cardigan and, if it takes me until Christmas, it will be done!

Monday 1 August 2011

I love mitts!

I love ....


It seems like ages ago since I last sat down to type a blog post!  I have been away for a long weekend in Boscombe near Bournemouth (about 300 miles away!) for a Tribal bellydance Teacher Training Course which has just been awesome.  I highly recommend Boscombe if you love vintage clothes and accessories!  The beautiful heart picture above was what came on top of my scrummy mocha in an amazing coffee shop called Boscanova in Boscombe (where they also have a weekly Knit and Natter)

Anyway, I am in love; with fingerless mitts!  My 'away' crochet project this weekend has been the Penny Farthing fingerless mitts by Aoibhe Ni from her Gloves to Love pattern book (which is available to download from Ravelry for a very reasonable price.) 

Now then, before I share the pics of the completed crochet, I want to gush over the beautiful patterns in the book because they are amazing. I am a big fan of Aoibhe's crochet patterns as they are so modern and beautiful and her patterns are regularly featured in Inside Crochet magazine.  The glove patterns are just beautiful and I want to make every single pair.  There are short mitts, long mitts, thick Aran weight mitts, 4 ply mitts, fancy patterns, plain.  I want them all!  It is pretty likely that is I know you, you will be getting some fingerless mitts for Christmas.

So, here are my mitts in their finished crocheting stage.  They still need seaming at the side and some ribbon and buttons adding (keep an eye on Facebook and Twitter for completed pictures).

Penny Feather Mitts