Welcome


Welcome to The Gingerbread Bunny! I'm Sarah, a textile artist specialising in crochet and felt based in Wigan in the North-West of England.

On my blog, you can find my day-to-day craft adventures and tutorials.

You can find details of my work for sale and workshops on my website - www.thegingerbreadbunny.co.uk

Wednesday 30 March 2011

Being Creative!

Last month I signed up to the Being Creative project on Julia Crossland's beautiful blog.  Every month she posts a new theme for the project and we all go away and create a piece of art that reflects that theme.  It is an opportunity to create art for the sake of creating art, an idea I just adore.

March's theme was Garden.  At first I wasn't sure what to create but eventually an idea came.  I had created a similar page in my art journal based on Andrea Schroder's Creativity 101 ecourse.

Countryside page from my art journal

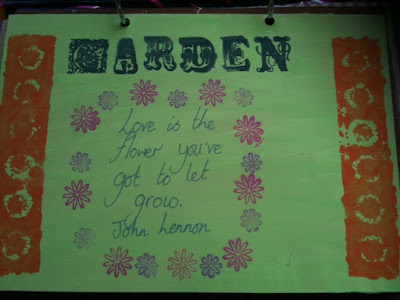
I love flowers and so they were the inspiration for my Being Creative art work.  I used a variety of techniques to produce it and had such fun playing around.  I started by covering the page in green tissue paper and then used a flower stencil create flower shapes in the background using a white dabber.  Using stamps, I added the flowers in pink and purple and then stamp smaller flowers along the bottom.  I love sparkle and had to add flower sequins, jems and brads to finish it all off.  I thoroughly enjoyed this months project and can't wait to get started on next's months theme of dessert! 


Garden page I made as part of the Being Creative project

The back of my Being Creative Garden work


Sunday 27 March 2011

Size does matter!

I have very recently learnt to crochet and am thoroughly enjoying this new found hobby.  I love the fact that I can crochet anywhere.  I crochet whilst watching TV, before I go to bed, whilst I'm waiting for my husband to get ready to go out (yes he does take longer than me to get ready) and this week I have even been crocheting during my dinner time at work.  

Crochet is the art of making fabric from yarn and the word crochet comes from the French word for hook.  It involves pulling loops of yarn through each other using a hook.  Now, as I have discovered, these hooks come in many sizes! 

In my recent free gift I received for subscribing to Simply Homemade magazine, I got a 4mm hook.  I have been happily crocheting away, unaware that you could get any other size hooks.  That is until, on one of my many supermarket shopping trips, I purchased a copy of Inside Crochet magazine.  I thought it would be good to see what else I could do with my new found creative skill rather than just crocheting squares and rectangles!  I liked the look of the Rapunzel scarf, which I intend to make, and saw that this required a 5mm hook!  So off I went to a most amazing wool shop (future blog post to come!)  and purchased said 5mm crochet hook.  Here I discovered that they had many hooks from a teeny tiny 1mm up to 7mm! 

My amazement at the 7mm crochet hook was, however, to be short lived.  To cut a rather long story short, we ended up at a craft fair and here I was to find the giant of crochet hooks! 

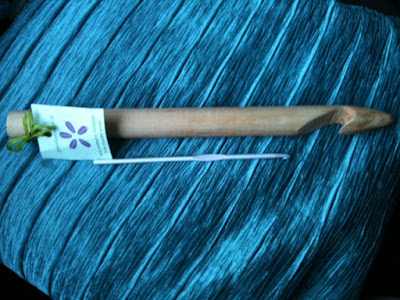
My teeny tiny 4mm hook and my gigantic monster of a 25mm hook!


A gigantic 25mm hook!  The lovely lady at green fusions showed me a gorgeous loose knit scarf she had been making with said giant hook and I knew I had to have it.  I too want to make this beautiful loose knit scarf.  So the hook was mine. 

It appears that, when it comes to crochet hooks at least, size does indeed matter!

Wednesday 23 March 2011

Apronology!


I can now share with you the present that I was making a few weeks ago!  The gift has been given and received gratefully.  I am posting in the form of a tutorial, my first one, so please forgive me if I make any mistakes!

I chose the fabric to suit the recipient of the apron.  She loves stars!  I based this apron on the project in the first issue of Simply Homemade but altered the shape of the pocket to make it more interesting and chose to use the same fabric for the ties rather than cotton ribbon!

I used:
1 metre of star fabric
1 FQ of patterned fabric
2 D rings
Sewing machine
Matching Thread

STEP 1 ~ Ironing

I started by ironing the fabric!  This is not my favourite part but is definitley necessary. I then pinned my greaseproof paper pattern to the fabric before cutting out the main apron shape, neck tie, 2 back ties and contrasting pocket with my trusty fabric scissors. 

STEP 2 ~ Pinning


 As my mother always taught me, you need to pin your fabric before sewing!  I pinned all my seam allowances and hems ready to sew.
STEP 3 ~ Sewing the main apron

The best bit.  Sewing!  I used my beautiful pink sewing machine to sew all the way round the out side of the main part of the apron.  I then stitched the neck tie and the back ties inside out, using a safety pin and long piece of string to pull them through the correct way.

STEP 4 ~ The pocket

I pinned the pocket seam allowance all the way round, stitching the top of the pocket.  I then pinned the pocket in place on the main part of the apron and stitched in place.

STEP 5 ~ Putting it all together

Finally, I attached the back ties and the neck ties, looping the shorter neck tie in half with 2 D-rings attached so that the length can be adjusted as needed.  And hey presto!  The apron was made!


I was most pleased with the final result.  I had made one for myself first as a practise and there where a few hiccups along the way, but I got there eventually.  As the friend in question is a keen knitter I made an appropriate card and matching gift tag.


Sunday 20 March 2011

Wrap me up!

There has been much journaling going on this week in the warren.  On Saturday I attended a journaling workshop based on The Artists Way by Julia Cameron.  It was being hosted at a local high school and, for £11.25 for a full day and your dinner, it was an opportunity not to be missed. 

I'm not really sure what I expected from it.  I was hoping that it would help with the writing aspect of my journaling as this is the part I always find the hardest.  The art bit, the painting and decorating pages, sticking sparkly bits on and generally having arty fun is easy and rewarding but when it comes to writing I often get a block.  What do I write about?  What have I got to say?  

Writing we got!  The lady running the course announced that she wanted us to write for 1 hour!  Yes, you heard me right, 1 hour!  My initial thoughts I will not print here but needless to say I did not feel good.  I felt intimidated by  the blank pages in front of me and  the prospect of sitting like a pudding for 1 hour with nothing to write about. 

So, in true teacherly fashion, I wrote the date and title, underlining them to!  It instantly took away the blank page, it was no longer as intimidating.  I then began to write about what had happened that day and then it just flowed.  One thought led to another and another and before I knew it I was writing.

Now, being completley honest, I have never sat down and just written before like I did then.  I never made myself do it.  It was a block, a barrier I had given myself and I chose the easy way out, to paint a pretty background.  As I said in my last post, ecourses like Andrea's and prompts from the Art Journaling magazine have helped me to write and record but, that 1 hour yesterday morning made me realise that I could write!

So, on to the title of my post, 'wrap me up'.  As you may have ascertained I love my art journal.  It is precious to me.  It is me as an artist and my thoughts and feelings and day to day happenings in my life.  It is my creative outlet.  It was sat there on my crafty work table, as beautiful as it is, but I felt it was missing something.  It needed to be kept in a special place, in a special way.  I decided to make it it's own special wrap! 

My beautiful journal and wrap.

I made the wrap from strips of fabric cut into rectangles and sewn together.  Some of the fabric is from old clothing I had, like a gorgeous silk skirt that no longer fitted, there is part of my wedding dress on there and other fabrics I had in my stash.  I then added ribbon and ric rac to cover the seams and used a zig zag stitch to make it look more decorative.  Finally I added a button (one a got from the Textile fair) and some pink ribbon to fasten it.  There was no pattern, it was just an idea and I played around until it looked right. 


Flat wrap
  I enjoyed making it so much I made one for my Mum, who loves her art journaling to, and have decided to make some for the Gingerbread Bunny Folksy shop when it is launched. 

Mum's journal wrap

Wednesday 16 March 2011

Art Journaling

Creativity is inventing, experimenting, growing, taking risks, breaking rules, making mistakes and having fun." Mary Lou Cook

Last summer I discovered Art Journaling.  It changed my life!  I had gone to America, with my Mum, to take a course in tribal bellydance.  There where several other people on the course, including a lovely lady called Tracy who we were car sharing with, and she was an art journaler.  She very kindly shared her journal, her work, with me.  It was beautiful.   I had never heard of art journaling before and was instantly interested in what it was.  I had made countless scrap books of holidays but they were quite basic and nothing exciting or expressive.  I learnt that art journaling is a way of expressing your self through your art.  It isn't about the end product, it doesn't matter if you make mistakes or how you use the products, it is about the process.  There are no rules, you make the rules! 
I began the hunt for art journaling materials, desperate to start my first journal straight away.  I bought a beautiful stamp and some papers as well as a gorgeous notebook and my first ever copy of Stampington's Art Journaling magazine.  What a magazine!  What inspiration I found within it's pages! 
When I got back I wanted to make a beautiful art journal of my trip and luckily had an old passport that I turned into my first ever art journal.  I was so pleased with it and will treasure it forever as a memory of my holiday!


As much as I love this journal, and it is a great reminder of my trip, it wasn't a reflective journal.  I wanted to explore this side of art journaling more.  I wanted to use it as a way of opening up my creative side and reflecting on, well, me.  I started a journal but soon gave up.  I loved preparing pages but found it difficult to write.  I just didn't know what to write about!  Also, the book was too big and a bit daunting.  I did some more research, got a book, got some older copies of Art Journaling magazine and searched the internet for ecourses and ideas.  From my research I made a list of journal prompts, joined a free ecourse on Creativity and started a much smaller A5 journal, adding my own pages to it when needed.  These have really helped me to open up my creativity and to write!
My most recent art journal began at the start of 2011.  I wanted to start the year with a new journal and chose a theme, a moto, for it 'Trust Yourself'.  Already my journal is getting quite thick as I use my prompts and ecourses as a way of opening up my creativity. 
My journaling has helped me to realise that I am a creative artist and I love it.


This page was inspired from Andrea
Schroeder's Creativity 101 ecourse. 


Creative Me!  This page was also inspired by Andrea
Schroeder's Creativity 101 course.


Sunday 13 March 2011

Hooked!

The bunny has learnt a new craft this week and is completley hooked! (I am sorry about the pun!)  I have learnt how to crochet.  It is something I have been threatening to do for a while and I am very proud to say that I taught myself the basic single stitch.  My mum showed me how to double and triple stitch and since then I haven't stopped.  I have 'crochet fingers' and I'm sure I'm acquiring a new callous, which I will bear with pride!  My first mini project is going to be a Mother's Day gift for my mother in law and, once complete, I will proudly post it on here. 
At last I have finished my bag.  This has been inspired by a project in the wonderful Simply Homemade magazine.  It has been made from an old pair of jeans with some fabulous purple and turquoise spotty fabric.  I initially intended it to be a project bag, however, when it was done I loved it so much that I wanted to use it as a handbag.  Since this picture was taken I have added a flap to the bag that fastens at the back so as not to spoil the bow detail at the front.  I love it!

Monday 7 March 2011

A Grand Day Out!

I am not one to turn down the opportunity to spend money and Sunday was no different!  After a little hiccup due to illness (poor Mum) me and my friend Jo headed off to the Manchester Antique Textile Fair at the Armitage Centre in Fallowfield, hosted by The Textile Society.  We had never attended before and it sounded pretty interesting so we decided to see what it was all about.  Initially I thought it would be very much lots of old fabrics (the antique bit!) and it had said on the website that different society's would be there, but nothing prepared me for what met my eyes when I entered that sports hall!  WOW!  Overwhelmed did not describe it.
The hall was packed with a variety of different stalls.  Many of them where selling vintage fabrics, clothing and other such items, which to be honest I was not overly interested in, but there where a number of stalls that caught my eye and caused me to spend way too much money!

Jo admiring the beautiful Inidan textiles! 

There where several stalls selling Indian textiles, which we swooned over longingly, thinking about the different ways we could use these very beautiful, and very expensive, items in a costume for tribal bellydance.  We also gazed longingly at those stalls selling African textiles, batik and wax printed fabrics standing out from everything else.  We found stalls selling sewing accessories and other such exciting items for keen sewers, knitters and crafters alike!  I  purchased some African fabric, a stash of beautiful pink fabrics, some hand crafted elephant buttons that have been made by ladies in South Africa, some gorgeous handpainted buttons (I bought so many the lady gave me a discount) some sari yarn, henna stamps, felt brooches, Indian hair sticks and, oddly of all, coloured masking tape!  I was, obviously, very restrained!


After the excitment of all that shopping, we felt the need for a brew and a sit down.  This is the part, unfortunatley where I need to moan!  One very small, what can only be described as a hatch, was all there was to purchase something wet and a snack.  Jo will tell you that her said cup of tea was bad, very bad!  I was glad I had opted for the Fanta.  Our second dissapointment was the lack of seating to rest ones weary feet from too much shopping.  However, we soldiered on, leaning against a wall to drink and eat crisps and chocolate, before taking a look at some of stalls upstairs.
Representatives from various societies could be found upstairs.  We admired spinning wheels, talked to some lovely ladies from the Quilting Society and Gawthorpe Hall, and admired the work of students who had been awared bursaries, wishing we had studied textiles at university so that we too could make all day! The Knitting and Crochet Guild/Society taught me, and others, how to finger knit and I have been practising since I got home. 
All in all we had an enjoyable afternoon.  We spent some money, swooned over beautiful textiles and learnt how to finger knit.  Yes, it cost £6 to get in (my husband was a bit shocked when I told him this), the parking was difficult, some stalls did not put prices on ther items (which really bugs me) and the refreshments where limited but will we return next year?  Of course we will!